How To:

Campervan Electrics

READ MORE IN NEW CONVERSIONS BOOK

Find lots more details in the NEW Self Build Campervan Conversions book

Planning a Campervan Electrics Project

1. Campervan Electrics

You've just bought a van and want to convert it into a camper van.  One of the main things you will want to do is think in advance about power and how to install electrics into your campervan.

There are a number of issues relating to electrics in a van conversion project.  If you have any plans whatsoever to sit in your campervan for an evening with the lights on, music playing, heater fan spinning away, then you should fit a second battery.  This is probably the key electrics issue and this article considers how you go about installing a second or "leisure" battery.

This article has now been expanded into three comprehensive chapters on campervan electrics in the new Renwick's Guides book Self Build Campervan Conversions.

How To Disconnect a Campervan Battery

2. Disconnecting The Battery

For many campervan conversion related jobs, the first thing you need to do is disconnect the battery.  This is primarily to avoid electrocuting yourself, but also in some cases to prevent potential damage caused while doing the work.

Disconnecting the battery is very straightforward - you need a socket set with the right size socket, open the bonnet, find the battery, take the cover off it if there is one, undo the negative terminal and tuck the earth lead well away from anywhere where it could accidentally touch the positive terminal.  Reverse this procedure to re-connect it, all the time being very careful not to touch both terminals at once.

  • Be especially careful when undoing a terminal with a socket wrench that you don't twist it round and hit the other terminal
  • You also need to be aware that connecting the positive terminal to anything metal while the negative earth lead is still connected will also result in a shock!
  • Be aware that if you are disconnecting the battery you may need a code to put into your radio or alarm after reconnecting it.
Campervan Leisure Batteries

3. Leisure Batteries

If you don't install a second battery into your campervan to run key electrical items off, then either you will at some point run your van battery down to the point where you can't start the engine in the morning; or you will constantly be living in fear of using up too much electricity and will end up reading by the light of head-torch rather than risk needing a jump start the next day.

Van Battery Types

There are two types of vehicle battery - starter batteries and 'second' batteries (second batteries are also known as 'leisure' batteries and 'deep cycle' batteries). Starter batteries are designed to supply large amounts of power in short bursts - specifically to start the engine; starter batteries are not designed to get regularly run down - they function best when the engine starts first time and the alternator then tops them straight back up.

Leisure batteries on the other hand are designed to function well when you run them down time after time - this is why they are called 'deep-cycle'.

Leisure batteries can in an emergency be used to start an engine, but they are primarily designed for extended use by lower power users - for instance by the sorts of appliance you find in a campervan or in a yacht.

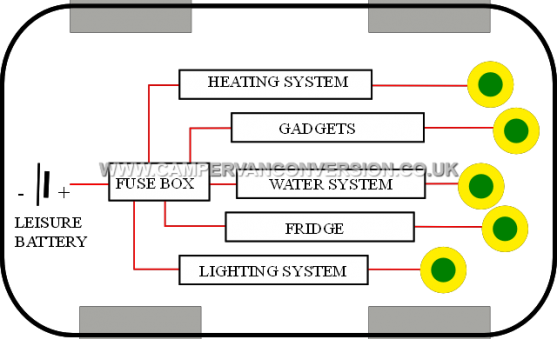
So, you've presumably already got a starter battery in your campervan - now you need to add a second 'deep-cycle' or leisure battery. Your starter battery will be used to start the engine, your second battery will be used to power your appliances (water pump, heater fan, sterio, lights, TV, laptop, electric blanket, etc, etc) while you're parked up. In this way you can happily forget about how much power you're using and know that you'll still be able to start the engine after your long weekend at the beach. Of course you do still need a way of re-charging the leisure battery, so the ideal arrangement involves a system where your van's alternator charges both batteries while you're driving, but only your leisure battery is drawn on whenever the engine isn't running.  Just as important, only the starter battery should be drawn on when the engine is started (as the massive current needed to start the engine needs a really thick cable which you're unlikely to have going to your leisure battery).

Installing a Leisure Battery

Firstly, find a good place to store your second battery.  First choice is in the engine compartment but there often just isn't space.  Ideally you want to have the leisure battery as close as possible to the starter battery and alternator (making charging more efficient and cutting down on cable routing), and you also need to think of safety - batteries give out hydrogen when they charge and can potentially leak acid and even blow up.  So if you need to site the battery inside the van due to lack of space in the engine compartment, you'll need to create a boxed in area keeping the battery isolated from pretty much everything else.  In particular, do NOT put the battery right next to the gas! - definitely asking for trouble!  Most batteries come with a tube that allows you to vent hydrogen produced during charging to the outside of the vehicle.  You need to fix the battery firmly in place too - an opportunity to be inventive!

Old school Leisure Battery Split Charge Relay Diagram

4. Charging Leisure Batteries & Split Charge Relays

One of the many ways you can charge your leisure battery is using a split charge relay.  However, on modern vans this is more complicated than it used to be, and there are now much better solutions available.

There are three comprehensive chapters on campervan electrics in the new Renwick's Guides book on Self Build Campervan Conversions which is well worth reading for more information than we have here.

Firstly, how does battery charging work - well, essentially your van's alternator charges your starter battery whenever you're driving, and you want to hook your leisure battery up so that it gets charged as well.  If all else was equal, all that's really needed to achieve this is a big cable running from the positive terminal of the starter battery to the positive terminal of the leisure battery, plus an earthing cable.  At the simplest level, this is all the cable you need to get the alternator to charge the battery.

HOWEVER!!!  Unfortunately it's not quite as simple as that, because you want to protect both batteries from getting used at the wrong times.  The old school solution to this problem is what's called a 'Split Charge Relay'.  With split charge arrangements, the relay control switch is only on when the engine is running, so that the alternator charges the leisure battery while driving; but with the engine off, the van appliances only draw juice from the leisure battery preventing the starter battery from going flat.  Usually the split charge relay's control switch is an 'ignition switched source' such as the alternator charge warning light.  On older vans, fitting split charge relays was fairly simple, but on modern vehicles there are better solutions available with much simpler wiring as well as greatly improved charging performance, not to mention improved safety.

The more modern the vehicle, in general the more complex the wiring and the more powerful the alternator.  This means that on many modern vehicles the old DIY solution of a split charge relay becomes ALOT more complicated.  It's harder to find the right wires to get the ignition-switched relay source, and because modern alternators can be much more powerful the wires involved can need to be much thicker.  There is also an increasing trend towards 'intelligently managed' charging systems - cobbling together a simple split charge system on top of a complex modern wiring setup might well not work quite as you intended it to!

There are various solutions, but our favourite is a new breed of charging systems that make putting together your campervan and motorhome electrics far simpler, better, and safer - these issues and many more are discussed in much more detail in the new book on Self Build Campervan Conversions which was written in collaboration with us here.